VIDEO TUTORIAL
How to Use Much Less Resin on a River Table!
River Tables have become a popular DIY and professional resin and woodworking project. However, traditionally a lot of expensive resin is used to fill the river at considerable expense.
In this video we will demonstrate a method that allows you to still create a stunning River Table but uses much less resin thus saving considerable amounts of money.
What You Will Need
Materials
The process is demonstrated using a range of our GlassCast Products including:
- GlassCast 50 Resin
- CULR Jet Black Pigment
- P120-1200 Mirka Abranet Abrasive Discs Combination Pack
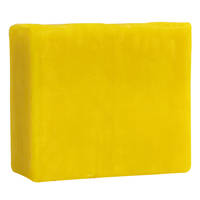
- Yellow Filleting Wax
- Ball End Wax Filleting Tools Set of 3
- Plastic Demoulding Wedges
- Plywood for infill
- RW4 Spray Wax Release Agent
- Flash Release Tape
- Mixing cups, sticks and nitrile gloves
- NW1 Plus Super Cutting Compound
- Medium/Hard (Orange) Polishing Pad
- TOPFINISH 2 Ultra Gloss Polishing Compound
- Soft Wavy Black Polishing Pad
Additional Items
- Eye protection
- Protective clothing and surface to work on
- Digital scales
- Scissors and tape
- Protective workgloves for demoulding and finishing the River Table
Step-by-Step Guide
Basic Technique
The basic materials and processes used in this video are almost identical to making a traditional River Table. As such we would recommend you watch our River Table Tutorial where we cover the full process in extensive detail prior to following the process in this video which builds on that knowledge.
Access to some wood working tools will be useful for this project although some of the aspects such as trimming the wooden planks to size or cutting the edge of the table can be outsourced if you do not have the necessary wood saws to do it. The remaining hand and power tools are all readily available on the DIY market from a variety of sources.
2. Preparing the Wood Planks
In a few videos online, a river is simply routed into the wood surface. However such tables will appear very flat as the texture and patterning of the grain will not follow the waney edge. So for our method, we recommend the use of a traditional waney edged plank to retain that grain and ensure the finished river table still looks great.
Planks can be sourced from a number of places any many suppliers may also be able to cut the plank to size ready for you to use. The loose bark and material can then be removed from the edge and the edge sanded smooth ready for use.
3. Making and Preparing the Enclosure
Enclosures for pouring a river table can be made in a number of ways, including polypropylene sheet and wood based materials such a melamine. For this project, melamine sheeting is being used. The upstands are cut then then screwed to the base.
To seal the joins between the base and upstands, Yellow filleting wax is used. This is formed and pressed tightly into the join lines to ensure a seal, The wax is then smoothed and formed into a fillet using a Ball End Wax filleting tool. Excess wax can then be trimmed off with a wedge before any final excess traces removed by rubbing a ball of wax against the residue to lift it off.
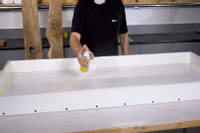
Although resins do not generally stick to melamine, it is wise to use a mould release agent to ensure easy removal of the finished table. A mould release wax or spray are good choices and in this case we are using our RW4 Spray Release wax. One good even coat is applied over the enclosure with extra care taken to cover the corners and joins.

4. Making the Plywood Core
Everything seen until now is standard technique for any river table project. At this point, the process will change slightly to enable reducing the resin amount used. When using a solid or opaque metallic effect river, a large solid block of resin is very wasteful. Anything under the surface of the resin cannot be seen, so it makes sense to use a cheaper material to block out that space. For this project, plywood is being used as a core material to reduce the resin used.
Before the plywood can be cut, it is important to accurately measure the dimensions and volume of the river, taking care to account for width, including how it varies, length and depth. Generally a good rule of thumb is to allow around 5mm gap all around the plywood core for the resin to be poured into. These measurements can be used to calculate the volume of the river and the volume of the plywood core. The volume of the core can then be subtracted to leave the approximate volume of resin needed.
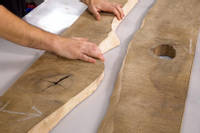
Transfer the profile of the live edge to the plywood. Then the profile can be cut out using a jigsaw. Depending on the taper of the edge, adjust the angle of the cutting blade to ensure a snug fit allowing for the 5mm gap all around. In this case we cut 5mm inside the drawn line to help take the taper into account
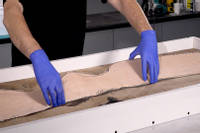
Once the initial cut is done, trial fit the plywood core and mark any areas that need additional cutting and adjustment, In this case a few minor areas need additional adjustment and the taper of the cut has been increased on the jigsaw to better match the live edge. The fit does not have to be perfect as long as you have a minimum all round of 5mm. We would recommend making plywood cores for any large knots as these can also use a lot of resin.
5. Pigmenting the Resin
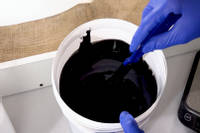
To ensure colour consistency between the 3 pours, it is good practice to pigment the resin all together then decant for each pour as necessary. In this case, the CULR Jet Black pigment is being used.
The resin is poured into a large enough mixing bucket and the pigment added to the resin. In this case, 5% by weight of the CULR Jet Black gives a good opaque black colour. Check the progress of the mixing by smearing the pigmented resin up the side of the bucket. The colour should still be strong even in these thin areas. A lid can be placed on the bucket and it is now ready for the first pour.
6. Base Pour
Using blocks of wood coated in Release Tape, the planks can be clamped down to the base to prevent movement during the resin pour. Then, using the measurements from before, the amount of resin for the 5mm base pour can be calculated.
As the ratio is by volume, calibrated mixing cups can help with measuring out the resin and hardener. Mix the resin thoroughly for 3 minutes before pouring into a new container and mixing again for another 3 minutes to ensure it is thoroughly mixed.
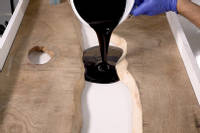
The resin can then be poured into the river and any knot holes. Once poured, using a brush, coat over the live edges of the river and knot holes before allowing the resin to part cure to the B stage. This is when the resin is firm but still tacky to the touch and at 20°C will take approximately 12 hours.
7. Bonding Down the Plywood Core
To bond down the plywood core, measure out and mix a small batch of resin. Simply pour this batch over the bottom of the river and knot holes. Carefully lower the plywood core into the river and knot holes, taking care to place it in at an angle then gently lower flat. This helps avoid trapped air under the core and ensure good resin coverage all over. Then, using a brush, coat the edges of the plywood and over the top with the resin as a sealing coat. Similar to the first pour, allow the resin to part cure until the B stage which should be approximately 12 hours.
8. Final Pour
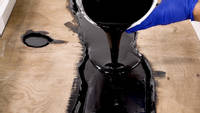
Similarly to the first two pours, this pour is a simple case of measuring out and mixing the final resin batch. It is then poured into the gaps around the Plywood core and over the top. The aim is to fill the river and knot holes up completely to the surface. In the case you have slight warping or twist in the wood, it is not a problem to be a mm or two shallow as the wood surface can be routed flat to give a smooth surface.
9. Machining the Table Surface
Now that the resin has fully cured, the enclosure can be dismantled and the table top easily removed from the melamine.
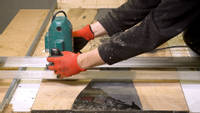
To machine the surface flat, the same router set up is used as seen in our original River Table Tutorial. This is done to both sides of the table top. The edges are then trimmed using a wood saw.
Before flatting with the sander, any small chips or pinholes can be repaired by mixing up a small batch of the resin and allowing to cure before sanding.
The table surfaces are then sanded using a dual action rotary sander and Mirka Abranet discs to remove the machine marks and get a smooth surface up to 1200 grit. This process can be seen in detail in our dedicated video on Sanding and Polishing.
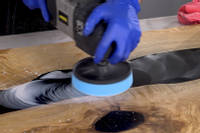
10. Finishing the Surface
Now that the surface is nice and smooth, it is time to polish the resin to a high gloss. Before polishing the resin, we like to treat the wood surface first so that any polishing compound does not stick in the grain of the wood. In this case Danish oil is used but there are a variety of alternative wood finishes available that can be used.
To polish the resin to a high gloss, The NW1 Plus Cutting Compound is used with a polishing machine and a medium firmness foam pad. To get a very high gloss finish, the NW1 is followed up by polishing with the Topfinish 2 Ultra gloss polish and a soft pad.
The table top is now complete and can be attached to your choice of legs or fixings. The use of the Plywood Core has meant that we were able to use only one third the resin, saving considerable cost over the conventional river table techniques.
DISCUSSION (11)
Please share any questions or comments you may have about this video tutorial.
The underside looks pretty similar to the top. You could finish the underside as perfectly as the top if you so wished.
There is no need structurally to do so as the resin to wood bond is generally very strong.
There is a very good chance you would see the join line. Depending on the pigments used it may be more obvious in certain shades.
No as the wood and plywood are strong anyway and the resin bond between them is also strong due to the preparation. So on balance it would certainly not be any weaker than a typical river table.
Not really as it is still a good idea to seal the core with resin as we did. So you would not really save any pigment (and resin) as you are pouring all the layers from the pre-pigmented resin batch.
Shrinkage on some types of resin can be significant. Modern Epoxies in general, and especially the GlassCast range are exceptionally low shrinkage.
....... To use a third of the resin for an 11 litre void you would need to use 3.67 litres (33% of the volume). Your own calculations showed that you needed 42% of the volume and used a 5 litre kit. I know this doesn't seem like a large discrepancy but resin is quite expensive so the difference in cost is actually not insubstantial. I am not writing this to pour cold water on the techniques shown in this vid, they are very helpful but viewers should take the claims about how much resin needed for a project with a grain of salt.
Hi Dhufish, thanks for the nice feedback on the video, however, I think you might be the one who's got their maths wrong! We don't use all 5kg for the project, we only use 4.2kg (as shown in the calculation at 04:55). Admittedly, this works out at 4.2kg (with core) vs 11kg (without core) which equals 38%, not 33% (a third) but for the sake of an easily understandable ratio, I hope you'll excuse us for 'rounding' 0.38 to 1/3. Also, this is actually quite a small table and the resin isn't very deep. On a larger pour (especially a deeper one) you'll find that the percentage of volume occupied by the wooden core is often more than 2/3 (because the 5mm resin gap remains the same) so for many projects, we're actually under-selling the potential saving.
In theory, the maximum resin depth you're ever pouring on this project is no more than about 10mm and so this is definitely not particularly 'deep pour' by epoxy standards. From the GlassCast range, you could get away with the GlassCast 10 (up to 10mm) but we suggest the GlassCast 50 (which can be used for up to 25mm / 1 inch) pours in a single go; just to be on the safe side.
Hi David, it is not necessary to degas the resin, as the GlassCast range of resins have good self degassing properties.
Ideally you want the dust to have settled and also not do dusty work while it is curing. You could even make a card box cover to keep dust off it. However in this specific case where the surface is being routed, sanded and then polished; any odd dust specs that fall on the surface, while the resin cures, would be removed during post processing.
The first coat of Danish oil is designed to seal the wood and prevent any staining from the polishing compound. After that, you will need multiple applications of Danish oil to get the full protection and finish it can offer but we've found Danish oil to be a great finish, in fact we've made lots of tables all finished with Danish oil and they've stayed looking great for many years. There's lots of finish options for wood and it's personal taste but this is certainly one that we like.
LEAVE A COMMENT OR QUESTION
Downloads (1)
| How to Make a Less Resin River Table |
USED IN THIS PROJECT
Want to buy the same materials and equipment used in this tutorial? We've got you!
Please find below a list of all the materials and equipment used in this project, all available to buy right here on the GlassCast website. Shown alongside each product is the approximate quantity used in the tutorial video, to the nearest full pack.
RESIN & PIGMENTS
POLISHING
FLATTING
DISCUSSION (11)
Please share any questions or comments you may have about this video tutorial.
The underside looks pretty similar to the top. You could finish the underside as perfectly as the top if you so wished.
There is no need structurally to do so as the resin to wood bond is generally very strong.
There is a very good chance you would see the join line. Depending on the pigments used it may be more obvious in certain shades.
No as the wood and plywood are strong anyway and the resin bond between them is also strong due to the preparation. So on balance it would certainly not be any weaker than a typical river table.
Not really as it is still a good idea to seal the core with resin as we did. So you would not really save any pigment (and resin) as you are pouring all the layers from the pre-pigmented resin batch.
Shrinkage on some types of resin can be significant. Modern Epoxies in general, and especially the GlassCast range are exceptionally low shrinkage.
....... To use a third of the resin for an 11 litre void you would need to use 3.67 litres (33% of the volume). Your own calculations showed that you needed 42% of the volume and used a 5 litre kit. I know this doesn't seem like a large discrepancy but resin is quite expensive so the difference in cost is actually not insubstantial. I am not writing this to pour cold water on the techniques shown in this vid, they are very helpful but viewers should take the claims about how much resin needed for a project with a grain of salt.
Hi Dhufish, thanks for the nice feedback on the video, however, I think you might be the one who's got their maths wrong! We don't use all 5kg for the project, we only use 4.2kg (as shown in the calculation at 04:55). Admittedly, this works out at 4.2kg (with core) vs 11kg (without core) which equals 38%, not 33% (a third) but for the sake of an easily understandable ratio, I hope you'll excuse us for 'rounding' 0.38 to 1/3. Also, this is actually quite a small table and the resin isn't very deep. On a larger pour (especially a deeper one) you'll find that the percentage of volume occupied by the wooden core is often more than 2/3 (because the 5mm resin gap remains the same) so for many projects, we're actually under-selling the potential saving.
In theory, the maximum resin depth you're ever pouring on this project is no more than about 10mm and so this is definitely not particularly 'deep pour' by epoxy standards. From the GlassCast range, you could get away with the GlassCast 10 (up to 10mm) but we suggest the GlassCast 50 (which can be used for up to 25mm / 1 inch) pours in a single go; just to be on the safe side.
Hi David, it is not necessary to degas the resin, as the GlassCast range of resins have good self degassing properties.
Ideally you want the dust to have settled and also not do dusty work while it is curing. You could even make a card box cover to keep dust off it. However in this specific case where the surface is being routed, sanded and then polished; any odd dust specs that fall on the surface, while the resin cures, would be removed during post processing.
The first coat of Danish oil is designed to seal the wood and prevent any staining from the polishing compound. After that, you will need multiple applications of Danish oil to get the full protection and finish it can offer but we've found Danish oil to be a great finish, in fact we've made lots of tables all finished with Danish oil and they've stayed looking great for many years. There's lots of finish options for wood and it's personal taste but this is certainly one that we like.