
VIDEO TUTORIAL
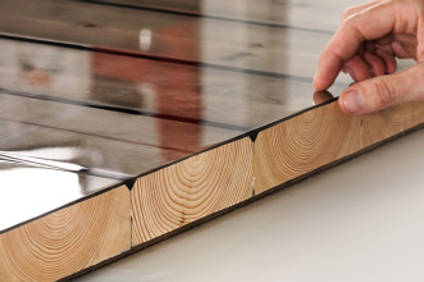
Glass-Like Bartop Using Smoked Resin
In this step-by-step tutorial we demonstrate a unique and easy-to-follow process that can be used to transform basic low-cost planks into a stunning high-end bartop, suitable for a home bar, man-cave or even commercial project.
This ingenious technique uses GlassCast 3 epoxy resin with a smoky tint, poured over simple softwood planks to produce an elegant, practical, glass-like bartop using only basic tools and equipment.
What You Will Need
Materials
To complete this project you will require the following materials:
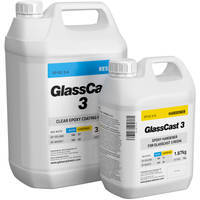
- GlassCast 3 epoxy resin
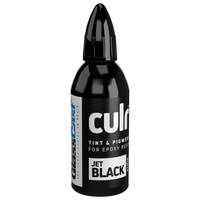
- Jet Black CULR epoxy pigment
- 44 x 144mm (6" x 4") softwood planks (or similar)
- RW4 Spray Wax release agent
- PVA glue
- Wood screws
And the following tools and equipment:
- Router with a 45° chamfer bit
- Circular saw (unless planks are already cut)
- Planer or a sander (or sanding block for smaller projects)
- Very flat/level work surface
- Masking tape
- Digital scales
- Tape measure
- Mixing cups, sticks and nitrile gloves
- Personal protective equipment (PPE)
Step-by-Step Guide
1. Select and Prepare the Wood
For this project you will need a router with chamfer bit, a planer or circular saw and a sander as well as the common ancillary items for working with resins. You will also need your chosen wood, for the chunky aesthetic we were looking to create, we chose planks with a smooth planed finish, 44mm x 144mm. These were cut to down to length by our wood supplier.
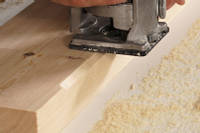
To produce the ‘V’ groove where the planks meet, use the router to cut a chamfer along each of the top edges.
2. Prepare the Jig & Drill Baseboard
Creating a jig to position the wood will ensure that all the pieces will be kept in line to create straight edges to the table. The planks can then be placed in the jig with the chamfered edges facing down and the baseboard placed on top. Marking out the position of the planks will mean that the baseboard can be marked up with screw holes in the centre of the planks.
Once marked up, these positions can be drilled and countersunk in preparation for screwing.
3. Glue Planks Together and Screw to Baseboard
Using a PVA wood glue, the planks can then be glued side by side and clamped in position. Whilst the glue is still wet the baseboard can be screwed into position on the underside of the planks. The table can then be turned over and any wet glue that has been squeezed into the ‘V’ grooves can be removed.
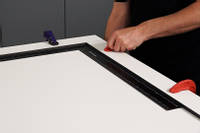
4. Level-Off & Create Tape Barrier
Once the glue has fully dried, the masking tape barrier can be applied to sit about 5mm above the height of the wood top. This will hold the resin in place and prevent it from leaking down the sides. If there are any areas in the joints of the wood that have gaps, these can be filled and sealed with a fast-curing epoxy adhesive. At this point it’s also important to make sure that the table is level in both directions.
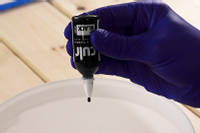
5. Tint Darker Resin for Grooves
The next step is to fill the groves with resin and seal top faces of the wooden planks. You will need about 750g of resin per m², this works out at 500g of resin and 250g of hardener per m². To pigment the resin at this stage we recommend 1 drop of pigment per 100g or 7-8 drops per m². To give you the most amount of time to work with the resin you can pigment the resin and mix it before adding the hardener. To make sure that the resin is completely mixed good practice is to use the double potting method.
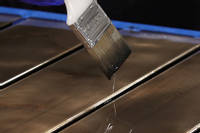
6. Apply Sealing Coat & Fill Grooves
Within 30 minutes of mixing the resin it needs to be emptied from the pot and applied to the surface of the bar top. Using a brush, coat the whole surface with the pigmented resin and fill the grooves up to the top, level with the rest of the surface. This then needs to be left for the resin to reach the ‘B’ stage, at 20°C this will take between 6-12 hours.
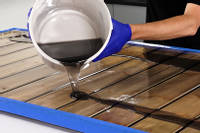
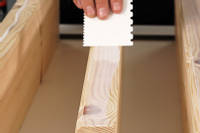
7. Tint, Mix & Pour Main Resin Surface
For the main pour of resin you will need approximately 2.5kg per m², this works out at 1.7 kg of resin and 0.85kg of hardener per m². This layer needs to be pigmented less than the previous pour around 1 drop per 300g or around 4-5 drops per m². Then mix well using the double potting method, mixing for 3 minutes in each bucket. Any unmixed resin in this layer will leave you with sticky patches on the surface. Once mixed, the resin can be poured onto the surface and dispersed with a notched spreader. Stubborn bubbles can be persuaded out with gentle heat from a hair dryer or heat gun.
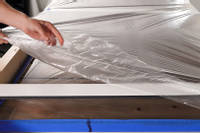
8. Cover & Allow to Cure
To avoid any dust particles from landing on the surface and spoiling the perfectly flat finish, a good idea is to cover the workpiece with a protective sheet as it cures. The resin can then be left to fully cure, at 20°C this will take around 24 hours.
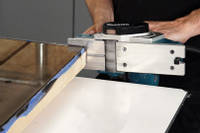
9. Plane-Off Edges
Once the resin has fully cured, the tape can be removed. Where the resin comes up to the tape it will have cured with a raised edge, there may also have been some resin leak down behind the tape. This can easily be addressed by shaving a few mm off the edge of the bar top with a power planer.
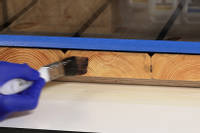
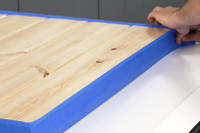
10. Brush-Seal the Edges
The edges of the wooden planks can also be sealed off with some more darkly pigmented resin to protect and bring out the colour of the grain. A good idea is to mask off the top edge to prevent resin from getting onto the top surface and keep it clean. The resin is then brushed onto the surface in a thin coating, removing the tape whilst the resin is still runny will prevent the resin from sticking to the tape. Once the resin cures to the ‘B’ stage a second coat can be applied.

11. Finishing the Edges
Once the resin has cured, any drips can be sanded flat. If the edge is visible, it can also be polished to a high gloss using some NW1 polishing compound.
DISCUSSION (0)
Please share any questions or comments you may have about this video tutorial.
LEAVE A COMMENT OR QUESTION
USED IN THIS PROJECT
Want to buy the same materials and equipment used in this tutorial? We've got you!
Please find below a list of all the materials and equipment used in this project, all available to buy right here on the GlassCast website. Shown alongside each product is the approximate quantity used in the tutorial video, to the nearest full pack.
RESIN & PIGMENTS
DISCUSSION (0)
Please share any questions or comments you may have about this video tutorial.